Friday, February 1, 2013

Chicken Chickpea Soup


With all the cold weather lately, I have really been craving some soup. I am bookmarking soup recipes left and right and have to control myself or else we would be eating soup every night. When I came across this Quick Chicken Chickpea Soup recipe on Eat, Live, Run , it moved to the front of the list because it seemed perfect for a day when I knew my time slot for cooking dinner was going to be short.  It was really delicious and flavorful. Also, super healthy! I think it must have been the swiss chard and the scent of the ginger that made it seem extra healthy. I ate the leftovers for breakfast and lunch the next day if that tells you how much I liked it!

Chicken Chickpea Soup (adapted from Eat, Live, Run)

Ingredients

  • 1 shallot, minced
  • 2 large carrots, sliced
  • 2 stalks celery, diced
  • 2 inch knob of ginger, minced
  • 2 cloves of garlic, minced
  • 1 jalapeno, seeded and thinly sliced
  • 1 Tbsp olive oil
  • 2 quarts chicken broth
  • 1 rotisserie chicken, shredded
  • 14.5 oz can of chickpeas, drained and rinsed
  • juice of 1/2 lemon
  • 1 bunch of swiss chard, chopped
  • Salt and pepper to taste
Directions
  1. Saute the shallot, carrot, celery, ginger, garlic and jalapeno in the olive oil for about five minutes, until veggies start to soften.
  2.  Add the broth, chickpeas, and shredded rotisserie chicken. Bring to a simmer.
  3.  Then add the salt, pepper, lemon juice, and swiss chard. Simmer until greens wilt (about five minutes) then serve.

Friday, January 25, 2013

Browned Butter Toffee Chocolate Chip Cookies


I took a hiatus from the blog for several reasons, but one of them being that I know nothing about photography and hated posting pictures that are...well, just not good. However, I have come across several good recipes in the mean time and hate that I can keep track of them all when I want to go back and make them again. Thus, I am going to try to resume posting when I have time despite bad pictures. Maybe one day I will get motivated to learn more and go back and update my pictures. Maybe. Anyway, let's start with these cookies! I made them primarily because I had a partial bag of toffee chips in my pantry that I wanted to use up, and it had been a while since I made any treats for Nick! They turned out to be even more delicious than I expected. Now I just have to control myself that Nick actually gets to eat some :)

Browned Butter Toffee Chocolate Chip Cookies (adapted from une gamine dans la cuisine)
Makes about 18 cookies

Ingredients:

  • 1 stick unsalted butter
  • 1.5 cups all-purpose flour
  • 3/4 teaspoons baking Soda
  • 1/4 teaspoon salt
  • 1 cup dark brown sugar (firmly packed)
  • 1 room temperature egg
  • 1/2 teaspoon vanilla extract
  • 3 oz  toffee bits 
  • 5 oz of dark or semi-sweet chocolate chips 
  • Coarse sea salt
Directions:
  1. Preheat oven to 350 F and line baking sheets with parchment paper.
  2. Brown the butter. Place the butter into a heavy-bottomed saucepan or skillet. Heat on medium heat until melted. Continue cooking, swirling pan often until butter is dark golden brown and has nutty aroma. This takes a few minutes, but when it happens, it happens quickly so keep an eye on it! Remove the pan from heat and let cool. 
  3. In a mixing bowl, whisk together the flour, baking soda and salt. Set aside.
  4. In the bowl of a stand-mixer, fitted with the paddle attachment, beat the cooled butter and brown sugar for 3-4 minutes, scraping down the sides of the bowl if needed. 
  5. Add the egg and vanilla and beat until thoroughly mixed in. 
  6. Turn the mixer to low speed and slowly add the dry ingredients, mixing only until just combined.  
  7. Add toffee bits and chocolate chips and mix briefly so they are incorporated but be careful not to overmix!
  8. Roll dough into balls (mine were probably 2 Tbsp in size).
  9. Bake for 10-12 minutes.
  10. Immediately after removing from oven, lightly sprinkle with sea salt.
  11. Let cool on cookie sheet to set before moving to a cooling rack


Tuesday, January 1, 2013

Savory Pumpkin Cornbread Mini Muffins

I can't remember when I first typed up this recipe, but I would guess at least a year and a half ago. I keep coming back to it so I decided it was finally time to take pictures of them so I could share it with you! We are having them with our new years dinner tonight, but they are also great served with chili or even eaten just on their own! I love, love, love cornbread, but it is generally not so healthy for you. I tried to lighten up this recipe by adding pumpkin and taking out butter and oil. It results in light and fluffy muffins that come in at about 55 calories each, which is a good thing because I always eat several at a time!

Savory Pumpkin Cornbread Mini Muffins (Makes 12 mini muffins)
Ingredients:
  • 1/2 cup cornmeal 
  • 1/2 cup whole wheat pastry flour 
  • 1 tsp baking powder
  • 1/4 tsp cayenne pepper
  • 1/2 tsp salt
  • 1/4 tsp baking soda
  • 1/8 tsp black pepper
  • 1/2 cup pumpkin
  • 2 tsp maple syrup
  • 1/2 cup low fat buttermilk (I use the lemon juice + milk substitute)
  • 1 egg

Directions:
1. Preheat oven to 350 degrees
2. Combine the dry ingredients (cornmeal through pepper) in a  medium bowl.
3. In a separate bowl, mix together the wet ingredients (pumpkin through egg).
4. Add the wet ingredients to the dry ingredients and stir just until combined.
5. Spray a mini muffin pan with nonstick cooking spray and spoon batter into pan.
6. Bake until a toothpick is inserted and comes out clean- approximately 14-17 minutes.

Approximate Nutrition Facts: (according to My Fitness Pal)
Calories: 54
Carbs: 10g
Fat: 1g
Protein: 2g

Monday, August 22, 2011

Basil Hummus

 I have been on a hummus kick lately but never actually made my own. (I'm pretty fond of Sabra's Roasted Red Pepper). When I came across this creamy basil hummus on Daily Garnish, I knew it was the first kind to try on my own!  I made it to go with one of my favorite summer meals: hummus and vegetable pizzas! It was delicious, and the basil flavor was really strong- in a good way. It reminded me of a healthier version of pesto. It was so easy to make, and I can't wait to start experimenting with other flavors!

Creamy Basil Hummus (from the Daily Garnish)
Ingredients:
  • 1 can garbanzo beans, rinsed and drained
  • 1 cup basil leaves
  • 2 tbsp lemon juice
  • 2 tbsp olive oil
  • 2 tbsp tahini
  • 1 tbsp water (I used 2, but would maybe use 3-4 next time for a less thick consistency)
  • pinch of salt
 Directions:
  1. Put basil and chickpeas in food processor. Pulse to chop combine.
  2. Add lemon juice, water, olive oil, tahini, and salt.
  3. Continue to run the food processor (you may need to stop and scrape down the sides a couple of times) until the hummus is smooth and creamy.

Monday, June 20, 2011

Super Fudgy Brownies

 Last weekend I made these brownies to serve at my cousins bridal shower. Since I have become a lazy blogger, I didn't really have any intentions of posting the recipe. But after several requests for the recipe and one woman even declaring it "the best brownie she had ever eaten," I knew this one was a keeper! They were really moist and fudgy without being gooey. I am posting the original recipe below with a few notes in parentheses. One other thing to note is that I ran out of granulated sugar while making these and replaced it with coarse sugar. I am not sure how much of an impact this made on the brownies so I will have to experiment with that in the future, but I am sure the results would be similar either way! I was just happy to know that you could use coarse sugar without it resulting in a grainy texture.

The Baked Brownie (from Baked: New Frontiers in Baking and seen on Divine Baking)
Ingredients:
  • 1 1/4 c all-purpose flour
  • 1 tsp salt
  • 2 T dark unsweetened cocoa powder (I used dutch process cocoa)
  • 11 oz dark chocolate, chopped (I used Ghiradelli 60% cacao)
  • 1 c unsalted butter, cut into 1 inch pieces
  • 1 tsp instant espresso powder (I omitted b/c I didn't have)
  • 1 1/2 c granulated sugar
  • 1/2 c packed light brown sugar
  • 5 large room temperature eggs
  • 2 tsp pure vanilla extract
Directions:
1. Preheat oven to 350 degrees F.
2.  Spray a 9x13 pan with nonstick baking spray (or butter and flour pan).
3.  In a medium bowl, whisk together the flour, the salt, and cocoa powder.
4. Set up a large sized double boiler. Place the chocolate, the butter, and the instant espresso powder (if using) in the bowl of the double boiler and stir occasionally until the chocolate and butter are completely melted and combined. Turn off the heat, but keep the bowl over the water of the double boiler and add both sugars. Whisk the sugars until completely combined and remove the bowl from the pan. Mixture should be room temperature.
5. Add three eggs to the chocolate mixture and whisk until just combined. Add remaining eggs and vanilla, whisking to combine. Do not over beat the batter or else the brownies will become cakey. 
6. Gently mix the flour/cocoa/salt into the chocolate with a spatula (not a whisk) just until incorporated.
7. Pour the mixture into the prepared pan.
8. Bake the brownies for about 30 minutes or until a toothpick comes out with just a few moist crumbs. Mine took 31 minutes, but you may want to check them early because everyone's oven is different, and you definitely don't want to over bake them!

Thursday, April 28, 2011

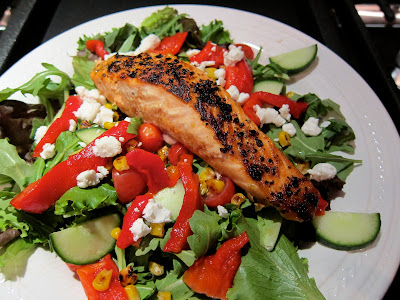
Salmon Salad with Roasted Red Peppers, Corn, and Goat Cheese

In my opinion, you can't really beat a delicious salad topped with salmon in both nutrition and taste! Salads are so flexible in that you can use whatever have on hand or happen to want that day, but I wanted to share this salad because I absolutely loved the combination of ingredients. It has tangy goat cheese, sweet roasted corn and red peppers, cucumbers, tomatoes, and is topped with a simple, yet delicious balsamic vinaigrette. As I write this and remember how good it was, I am thinking that I will have to make this again next week!
Salmon Salad with Roasted Red Peppers, Corn, and Goat Cheese
(Serves 4) 
Ingredients:
  • salad mix (I used half arugula and half mixed greens)
  • 4  4-5oz salmon fillets (I prefer wild caught)
  • Williams-Sonoma Potlatch Seasoning  (optional)
  • 2 tsp olive oil
  • 1 red pepper (or you can use jarred roasted peppers and skip steps 1-2)
  • 1/2 cup frozen corn
  • 1 small cucumber, sliced
  • 1 cup grape tomatoes, halved
  • 1/2 cup crumbled goat cheese
  • balsamic vinaigrette 
Directions:
  1. Preheat oven to 425 degrees.
  2. Place pepper on a cookie sheet and roast for about 20 minutes, turning half way. It may take longer, but you are looking for your pepper to turn mostly black. Remove from oven and place in a plastic bag (such as a ziploc). Once pepper has cooled, remove from bag, and peel skin. It should come off easily. Slice pepper into strips and remove seeds.
  3. Heat a nonstick skillet over medium heat. Add frozen corn and cook for 2-5 minutes, stirring occasionally until some kernels start to blacken. Turn off heat. Put corn in a dish and return skillet to cooktop.
  4. Season salmon with Potlatch Seasoning, if using, or with salt and pepper.
  5. Add 2 tsp of olive oil to skillet and turn heat to medium. Once pan is heated, place salmon in pan seasoned side down.
  6. Cook salmon until done, turning half way. Cooking time will vary depending on thickness of salmon, but it should flake easily when done. I would guess 8-10 min total, but watch it so you don't overcook it!
  7. While salmon is cooking, assemble salads. Place greens on bottom and top with red peppers, goat cheese, corn, tomatoes, and cucumber. Top with salmon and serve with balsamic vinaigrette.

Tuesday, April 12, 2011

Migas

I had never had migas before, but had read about them on a couple of blogs. So, when I received Tostitos Artisan Recipes chips as a part of the Foodbuzz Tastemaker program, I knew just what I wanted to make! I used the Pioneer Woman's recipe as a guide. I figured she would be a trusty source, and I had never used one of her recipes before, which I can't believe knowing how popular her blog is! These were really good! In fact, I have already made them twice within a month! Of course, I did cheat by using the Tostitos chips rather than frying my own tortillas. That was one step too many for me, and the Tostitos chips were great! I think Nick accurately described them as "the adult version of Doritos." We received both the black bean and garlic flavor and the fire roasted chipotle flavor. I am not sure that Nick had a favorite between the two, but my vote was definitely for the black bean and garlic. Anyway, on to the delicious recipe...

 Migas (adapted from the Pioneer Woman)
 Serves 4-5 people
Ingredients:
  • 1/3 cup corn tortilla chips, broken into pieces
  • 1 whole Jalapeno, Seeds And Membranes Removed, Finely Diced
  • 4 whole Plum Tomatoes, Roughly Chopped
  • 1 whole Green Pepper, Roughly Chopped
  • 1 whole Red Bell Pepper, Roughly Chopped
  • 1 whole Medium Onion, Chopped
  • 12 whole Large Eggs
  • ¼ cup reduced fat mexican blend cheese
  • 1/2 Tablespoon Butter
  • 1/2 Tablespoon Olive Oil
  • ¼ cup 2% milk
  • 1/2 avocado
  • salt and pepper
 Directions:
1. In a bowl, whisk together eggs and milk. Set aside.
2. In a large skillet over medium-high heat, melt the olive oil with the butter. Add onions and bell peppers and cook until starting to turn brown/black, about 3 to 4 minutes. Add in diced jalapenos and stir to combine. Add tomatoes to the skillet and stir around, then add chips, stirring gently to combine.
3. Reduce heat to low.
4. When the heat has decreased, pour eggs into skillet. Sprinkle with salt and pepper. Stir gently to cook with the peppers, folding mixture very gently as it cooks.
5. Add in grated cheese.
6. Once eggs are cooked and cheese is melted, removed from skillet and serve topped with avocado. 

Sunday, April 3, 2011

Samoas Bars

It has become the tradition here on Chicken on the Green to post the special treat made to honor Meggo's Birthday! For her 25th, there was the Strawberry Chantilly Cake. For her 26th, I made Monster Cookies. And today.... SAMOAS BARS! I chose to make these because Samoas (or Caramel deLites as they are known in some parts of the country such as Wichita) are Meggo's favorite Girl Scout cookies! She would buy them at work and then hide them in her desk. Meggo, please don't hide these. They do not quite have the same preservatives in them!
 I found the recipe for these on Baking Bites. These bars start with a shortbread cookie crust, then are covered with caramel and toasted coconut, dipped in dark chocolate, and topped with a dark chocolate drizzle. Yummy. They are fun to make although they do take some time. They are very reminiscent of the original, but if I am going to be completely honest, I don't quite think they match up to the perfected recipe those girl scouts have come up with. Man, they must work hard on those.
Samoas Bars (adapted from Baking Bites)
Ingredients:
Cookie Base:
  • 1/2 cup sugar
  • 3/4 cup butter, softened
  • 1/2 tsp vanilla extract
  • 2 cups all purpose flour
  • 1/4 tsp salt
Topping:
  • 3 cups shredded coconut (sweetened or unsweetened)
  • 12-oz good-quality chewy caramels
  • 1/4 tsp salt
  • 3 tbsp milk
  • 10 oz. dark or semisweet chocolate (chocolate chips are ok)
Directions:
To make the crust:
1. Preheat oven to 350F.
2. Line a 9×13-inch baking pan with nonstick foil and spray with nonstick cooking spray. (I really didn't want it to stick).
3.  In a large bowl, cream together sugar and butter, until fluffy. Add vanilla extract.
4. Working at a low speed, gradually beat in flour and salt until mixture is crumbly, like wet sand. The dough does not need to come together.
5. Scoop crumbly dough into prepapred pan and press into an even layer.
6. Bake for 20-25 minutes, until base is set and edges are lightly browned. Cool completely on a wire rack before topping.

To make the topping:
1. Unwrap the caramels and place in a large microwave-safe bowl with milk and salt. Cook on high for 3-4 minutes, stopping to stir a few times to help the caramel melt. When smooth, fold in toasted coconut with a spatula.
2. Put dollops of the topping all over the shortbread base. Using the spatula, spread topping into an even layer. Let topping set until cooled.
3. When cooled, cut into 30 bars with a large knife.
4. Once bars are cut, melt chocolate in a small bowl. Heat on high in the microwave in 45 second intervals, stirring thoroughly to prevent scorching. Dip the base of each bar into the chocolate and place on a clean piece of parchment or wax paper. Transfer all remaining chocolate (or melt a bit of additional chocolate, if necessary) into a piping bag or a ziploc bag with the corner snipped off and drizzle bars with chocolate to finish. (I had to melt more chocolate because I had bits of shortbread that fell in my chocolate.)
5. Let chocolate set completely before storing in an airtight container.